


Call/Text (973) 442 1111
Official Pet Stop® Owner’s Guide
Guide Table of Contents
Owner’s Guide > Indoor Transmitters
Indoor Transmitters
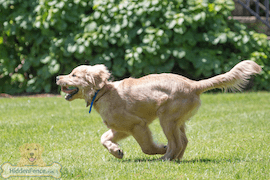
We know pets inside and out. Our indoor transmitters bring the benefits of boundary setting indoors. Our indoor transmitters can create either a wireless zone or be customized, using wire discretely hidden.
We also offer a battery-powered indoor unit that can be used where no electrical outlets are available. Applications vary but a few typical uses are in a waterproof enclosure to protect a garden or flower bed outside or locating it behind a wall to protect a passageway.
Your local Pet Stop dealer is trained to recommend a variety of boundary configurations to meet your particular needs.
Room Wizard
Features

Operation
Your Pet Stop RoomWizard can be set up in your home either as wireless or a wired system, depending on the needs of you and your pet.
Pet Stop RoomWizard – Wireless Operation
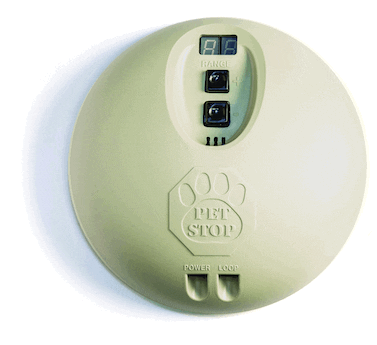
Place the RoomWizard unit in the location you want your pet to avoid. For example, if you do not want your pet to jump on the sofa, place the unit under the sofa. The RoomWizard can also be permanently mounted on a wall using the key hole slot on the bottom of the transmitter case.
Under normal operation, the RoomWizard will display the signal field strength number (such as “10”) and will make no sounds. This indicates the RoomWizard is operating normally. You can make adjustments to the signal field range to achieve the correction zone you desire. Pressing the upper button (”+”) will increase the signal field to a maximum of 32. Pressing the lower button (”-”) will decrease the signal field to a minimum of 1..
To turn on the RoomWizard unit:
- Plug the AC adapter into an AC electrical outlet.
- Plug the other end of the AC adapter into the LEFT connector on the RoomWizard marked “Power” as shown in photo below.
- The Range display should be lit to indicate the RoomWizard is on. If the range display is not lit, press the top Range Adjustment button to turn the unit on.
- Adjust the signal field range by pushing the upper button (+) to increase the range and the lower button (–) to decrease the range.
- Test the signal field range by using the receiver collar and listening for the beeps.
Remeber
Always remove your pet’s Pet Stop receiver collar before making any adjustments to the signal field range.
Pet Stop RoomWizard – Wired Operation
To keep your pet out of one or several rooms, it is recommended that boundary wire be laid around the edges of a room, or installed in the basement ceiling. Ask your Pet Stop dealer about wiring one or several rooms.
The Wired Mode adapter cord attaches to each end of the boundary wire by twisting them together and is reinforced with electrical tape for insulation. The Wired Mode adapter is then plugged into the RIGHT side of the RoomWizard unit, marked “LOOP”.
The RoomWizard unit’s AC adapter is plugged into an AC electrical outlet, then the other end of the AC adapter is plugged into the LEFT connector on the unit marked “POWER”. The Range Display should be lit to indicate the RoomWizard unit is on.
If the Range display is not lit, press the top Range Adjustment button to turn the RoomWizard unit on. Your Pet Stop dealer has set the range that is appropriate for your pet. You can adjust the signal field range by pushing the upper button (+) to increase the range and the lower button (–) to decrease the range.
If the transmitter detects a break in the boundary wire the signal field Range Display will begin to blink.
Note
The RoomWizard will not detect a break in the wire if the signal field setting is set below 6
Remember
Always remove your pet’s Pet Stop receiver collar before making any adjustments to the signal field range.
Battery Powered Transmitter
Features
The Pet Stop Battery Powered Transmitter is primarily intended for avoidance applications within a home or garage, and uses 4 standard AA alkaline batteries, and produces a signal range of up to 4 feet. The transmitter has an audible warning when the battery is low, which is useful if you mount the transmitter out of site, like in a closet or under a couch.
The Battery Powered Transmitter has a variety of settings that are set by using the dip switches that are visible through the top of the unit. Many of the settings are designed to extend battery life. For optimal performance consult your local dealer for how best to set up your unit.
Transmission LED:
Your unit is designed to “burst” the signal at a specific rate. Bursting the signal conserves the battery. The LED will illuminate at the end of a transmission packet. This will let you know the transmitter is functional and the receiver should activate when light illuminates.
Range Control
Sets range of transmission. Rotate Clockwise for maximum, Counter-Clockwise for minimum. Battery life will be maximized by setting the control to as short of range as practical for the application.
Operation
Battery Insertion
- Remove the 2 screws from the bottom of the transmitter case using a Phillips screwdriver.
- Insert 4 AA batteries in orientation as shown.
- Upon insertion of last battery, transmitter will power up. It will produce a 1 second beep while turning on the red transmission LED.
Remember
If the transmitter produces a series of rapid beeps for 10 seconds after power-up, this is an indication that the batteries are low and should be replaced.
4. Replace the case, being careful to align the indexing pins with the base. Re-install the 2 screws.
Helpful Hints
-
The only visual indication of operation will be a momentary illumination of the Transmission LED each time
the transmitter produces a burst of signal. - There is no ON/OFF switch. If you do not desire to have the unit transmitting, simply remove at least 1 battery.
- It is recommended to remove all batteries if not being used and being stored for extended periods
Additional Functions
Dip Position 5:
Place switch in the “ON” position (up) to enable low battery alert.
Place switch in the “OFF” position (down) to disable the low battery alert – PLEASE NOTE: in this position
transmitter will NOT alert you to the internal batteries being weak and needing replaced.
transmitter will NOT alert you to the internal batteries being weak and needing replaced.
Dip Position 5:
Place switch in “ON” position to turn the transmitter on. This switch may be moved to the “OFF” position
(down) to disable the transmitter.
(down) to disable the transmitter.